Integrating benchmarks into LM Evaluation Harness


Quantifying the performance of large language models is crucial to evaluating new techniques and validating new approaches so that different model releases can be compared objectively. LLMs are generally evaluated on several benchmark datasets and given scores, which serve numeric quantities to compare across models.
The LM Evaluation Harness is a Python-based framework developed by EleutherAI for evaluating the performance of language models on a wide range of NLP benchmarks. It supports multiple tasks such as multiple-choice, question answering, and classification, and is compatible with both local and API-based models (like OpenAI's GPT or Hugging Face models). The harness provides a standardized way to compare model performance across datasets like MMLU, HellaSwag, ARC, and more. It is modular, extensible, and widely used in the research community for assessing language model capabilities.
Several steps are required to integrate a custom benchmark from a local dataset into lm evaluation harness, this blog will tackle integrating your custom dataset in multiple choice question fashion following the standard MMLU approach and the MMLU-Var approach.
The standard MMLU benchmark uses a multiple choice format, The model receives a question along with a list of possible answers (A, B, C, D) and is prompted to select the correct one. For example, in a question about the capital of the UAE, the model sees both the question and all four answer choices in the input. For example, the prompt would look like:
Question: What is the Capital of UAE ?
A. Ras Al Khaimah
B. Abu Dhabi
C. Dubai
D. Al Sharjah
Annswer:
MMLU-Var uses a continuation-based approach. The model is given only the question followed by the prompt "Answer:", without any answer choices. The system then evaluates the likelihood the model assigns to each possible answer (as separate completions), and selects the one with the highest log-probability. For example, the prompt would look like:
Question: What is the Capital of UAE ?
Annswer:
So during the evaluation the choices are used by the evaluator to compute the probability of each choice as a continuation to the given prompt following this simplified formula for each output token:
Log-Probability(candidate) = log P(t₁ | prompt) + log P(t₂ | prompt, t₁) + ... + log P(tₖ | prompt, t₁,...,tₖ₋₁)
Then, the evaluator selects the candidate with the highest log-probability sum. The model is judged correct if the selected candidate matches the gold answer.
When using the continuation mode, usually the sum of the probabilities will lead to wrong results because we are summing probabilities for each token. Hence the normalized accuracy provides a better interpretetation for the model behavior in multitoken answers scenario.
The normalized accuracy follows the following formula:

let's take our previous example:
"Abu Dhabi" → 2 tokens (["Abu", " Dhabi"])
"Dubai" → 1 token (["Dubai"])
Without normalization (acc): Multi-token answers face a probability penalty because:
- P(multi-token) = P(t₁) × P(t₂|t₁) × ...
- (Multiplication of probabilities ≤1 → product decreases with more tokens)
Hypothetical scenario: If the model equally knows both answers:
- P("Dubai") = 0.5 → log_prob = -0.30
- P("Abu Dhabi") = P("Abu")=0.7 × P(" Dhabi"|"Abu")=0.6 ≈ 0.42 → log_prob = -0.37 → Model incorrectly chooses "Dubai" despite equal knowledge.
With normalization (acc_norm):
- "Dubai": -0.30 / 1 = -0.30
- "Abu Dhabi": -0.37 / 2 = -0.185 → This will favor the correct answer "Abu Dhabi" over "Dubai".
Integrating your benchmark into the framework
Requirements setup
Start by cloning the official repo from EleutherAI, to make things simple you can install the python package in developement mode to easily try the newly added benchmarks.
https://github.com/EleutherAI/lm-evaluation-harness.git
cd lm-evaluation-harness
pip install -e ".[dev]"
And now we are ready to go for the next step.
Preparing the dataset:
Now let's talk a bit about the dataset creation. It is recommended to use the jsonl format to make thing easier to process but json format is also fine. I am going to use my own dataset as an example: The dataset and the paper could be found in the following link dataset The dataset in in multiple choice question format (similar to the previous example). But I am going to convert the dataset to jsonl format and prepare it to be suitable for the integration in our framework.
So if we check the dataset we can see that all the questions are in the questions object key
{
    "dataset": "DFIR-Metric Dataset (Module I MCQ challenges)",
    "authors": ""
    "sources": "https://github.com/DFIR-Metric",
    "number_of_questions": 713,
    "questions":
[
  {
    "question": "You work as a penetration tester for Hammond Security Consultants. You are currently working on a contract for the state government of California. Your next step is to initiate a DoS attack on their network. Why would you want to initiate a DoS attack on a system you are testing?",
    "options": {
      "A": "Demonstrate that no system can be protected against DoS attacks",
      "B": "List weak points on their network",
      "C": "Use attack as a launching point to penetrate deeper into the network",
      "D": "Show outdated equipment so it can be replaced"
    },
    "answer": "B"
  },
  {
    "question": "What will the following command produce on a website login page? SELECT email, passwd, login\\_id, full\\_name FROM members WHERE email = '[email protected]'; DROP TABLE members; --'",
    "options": {
      "A": "Retrieves the password for the first user in the members table",
      "B": "Deletes the entire members table",
      "C": "This command will not produce anything since the syntax is incorrect",
      "D": "Inserts the Error! Reference source not found.email address into the members table"
    },
    "answer": "B"
  },

........
  }
}
We can use the following script to save the dataset to jsonl format:
import json

with open("DFIR-Metric-MCQ.json", "r", encoding="utf-8") as infile:
    data = json.load(infile)  # Load entire JSON array

with open("validation.jsonl", "w", encoding="utf-8") as outfile:
    for item in data["questions"]:
        json.dump(item, outfile)
        outfile.write("\n")
So at this point we will have our validation.jsonl file that holds only the MCQ questions. We will end up with the following file:
{"question": "You work as a penetration tester for Hammond Security Consultants. You are currently working on a contract for the state government of California. Your next step is to initiate a DoS attack on their network. Why would you want to initiate a DoS attack on a system you are testing?", "options": {"A": "Demonstrate that no system can be protected against DoS attacks", "B": "List weak points on their network", "C": "Use attack as a launching point to penetrate deeper into the network", "D": "Show outdated equipment so it can be replaced"}, "answer": "B"}
{"question": "What will the following command produce on a website login page? SELECT email, passwd, login\\_id, full\\_name FROM members WHERE email = '[email protected]'; DROP TABLE members; --'", "options": {"A": "Retrieves the password for the first user in the members table", "B": "Deletes the entire members table", "C": "This command will not produce anything since the syntax is incorrect", "D": "Inserts the Error! Reference source not found.email address into the members table"}, "answer": "B"}
{"question": "What is the first step that needs to be carried out to crack the password?", "options": {"A": "If it matches, that password has been cracked and the password cracker displays the unencrypted version of the password", "B": "The list of dictionary words is hashed or encrypted", "C": "The hashed wordlist is compared against the target hashed password, generally one word at a time", "D": "A word list is created using a dictionary generator program or dictionaries"}, "answer": "D"}
{"question": "What does the 'Prefetch' folder in Windows store?", "options": {"A": "Temporary internet files", "B": "System restore points", "C": "Application execution information", "D": "User documents"}, "answer": "C"}
........
Until here we need to memorize that the key for each prompt question is question the key for for set of answer choices is options the correct answer key is answer. We need to save all of this information to be able to write out benchmark task file later on.
Writing task YAML file:
So now we can create our task directory and start populating the different files: The task folder structure should look similar to the following (I am taking my difir benchmark as an example)
| lm-evaluation-harness
|____ lm_eval
      |____ tasks
            |____ dfir
                  |____ dataset
                  |      |____ validation.jsonl
                  |____ dfir.yaml
Now we need to define a couple of parameters in our YAML file (AKA the task configuration file). Let's start by specifying the benchmark task name and the data path (AKA the jsonl file that we produced earlier)
task: dfir_mcq_mod
output_type: multiple_choice
dataset_path: json
dataset_name: null
dataset_kwargs:
  data_files: "lm_eval/tasks/dfir/dataset/validation.jsonl"
num_fewshot: 5
validation_split: train
So as you can see we defined our task name as dfir_mcq_mod, because we are using a local dataset in json formal we will specify the dataset_path as json because these parameters are passed to the load_dataset function from hf package datasets a quick look into the documentation shows that we can pass an argument list to the function with a parameter called data_files that specify the dataset path in json or jsonl format. Hence we defined a dataset_kwargs parameter with an element dataset_files that hold as a value the relative path of our jsonl file. Finally, we define two other parameters the output_type as you already probably figured it out we are going to use a multiple_choice type, also we can specify the number of shots for our benchmark task using the parameter num_fewshots let's use 5 shots in our task. Since we do not have any splits in our dataset, we are just going to point our validation_split as the default split which is the train split. Further details about these parameters can be found in the official repo documentation
Specifying the question answering formats
According to the specification three parameters must be defined to instruct the proper way to hundle our benchmark data:
- doc_to_text (Union[Callable, str], optional) — Jinja2 template, string, or function to process a sample into the appropriate input for the model.
- doc_to_target (Union[Callable, str], optional) — Jinja2 template, string, or function to process a sample into the appropriate target output for the model. For multiple choice tasks, this should return an index into the answer choice list of the correct answer.
- doc_to_choice (Union[Callable, str], optional) — Jinja2 template, string, or function to process a sample into a list of possible string choices for multiple_choice tasks. Left undefined for generate_until tasks.
In our case we will proceed with Jina style definitions:
doc_to_text: "Answer the following question only by providing the letter corresponding to the right option only.\n{{question.strip()}} \nA. {{options['A']}}\nB. {{options['B']}}\nC. {{options['C']}}\nD. {{options['D']}}\nAnswer:"
doc_to_choice: ["A", "B", "C", "D"]
doc_to_target: "{{ ['A', 'B', 'C', 'D'].index(answer)}}"
So as seen in the YAML snipet for the doc_to_text parameter we just define the format of the question prompt, as we said earlier our question is held on the value of the key question and the answers choices on the value of the key options. For the doc_to_choice since we need the answer to be one of the options, we will just provide an array with the four answer options that we have. Finally, on the doc_to_target parameter, we will just provide a jinja template that selects the right answer by providing the index of the right answer from the choices array.
Defining metrics
FOr the metrics multiple choice are available ranging from defining some custom metrics or using the predefined metrics. In our case we are going to use the most simple approach, we will just use the predifined metrics for accuracy and the normalized accuracy. So we just have to define a list of metrics as you can see in the following snipet, we just need to define a metrics_list. For each metric we have to specify an aggregation method in our case. Since we are using a number of shots equal to five we are going to score our model according to the mean value accross the different answers.
metric_list:
  - metric: acc
    aggregation: mean
  - metric: acc_norm
    aggregation: mean
More advanced metrics parameters could be found on the documentation.
Full task definition file
And this point we are done with our task configuration, and we are ready to test our task. But just as an extra step we are going to add a metadata section. This section will help us later when using multiple checkpoints of the same model of a model with multiple configurations to evaluate the performance differences. The full YAML file would look like this:
task: dfir_mcq_mod
dataset_path: json
dataset_name: null
dataset_kwargs:
  data_files: "lm_eval/tasks/dfir/dataset/validation.jsonl"
validation_split: train
output_type: multiple_choice
num_fewshot: 5
doc_to_text: "Answer the following question only by providng the letter corresponding to the right option only.\n{{question.strip()}} \nA. {{options['A']}}\nB. {{options['B']}}\nC. {{options['C']}}\nD. {{options['D']}}\nAnswer:"
doc_to_choice: ["A", "B", "C", "D"]
doc_to_target: "{{ ['A', 'B', 'C', 'D'].index(answer)}}"

metric_list:
  - metric: acc
    aggregation: mean
  - metric: acc_norm
    aggregation: mean

metadata:
  version: 1.0
  revision: "{{model_args['revision']}}"
So now lets first check if our task is properly identified we can run the following commag:
python3 lm_eval/__main__.py --tasks list | grep dfir_mcq_mod
if you get a task in the shell output means everything went well so far

Now let's run our task we will just use SmolLM2 from huggingface but to make thing more fun we are going to evaluate multiple checkpoint to see how the model behaves during its training. Let's start by evaluating the following and early checkpoint using the following command:
NCCL_P2P_DISABLE=1 NCCL_IB_DISABLE=1 python3 ./lm_eval/__main__.py --model hf --model_args pretrained=HuggingFaceTB/SmolLM2-1.7B-intermediate-checkpoints,dtype=bfloat16,revision=step-125000 --tasks dfir_mcq_mod --batch_size auto --output_path results_mod/
The command is self-explanatory, you have to pass some arguments to specify the model, the task ,and the results output folder. if everything goes well you would have a similar output with the model scores according to the specified metrics.

now we can evaluate multiple checkpoint just by changing the revision=step-125000 argument and pointing to multiple checkpoint. The checkpoints can be found of the HF Repo: checkpoint
Each evaluation will generate a json file on the output directory that stores everything about our evaluation. Let's make things more fun and plot the data that have been recorded during the evaluation of the different checkpoints. This is where the revision tag that we added in the task file will be usefull to recognize to which checkpoint each output belongs to. We can use the following python code to plot the data extracted from the different evaluation json files:
from pathlib import Path
import json
import matplotlib.pyplot as plt
import numpy as np

results = []
for json_file in sorted(Path("./results_mod/HuggingFaceTB__SmolLM2-1.7B-intermediate-checkpoints/").glob("**/*.json")):
    with json_file.open() as f:
        results.append(json.load(f))

import matplotlib.pyplot as plt
import numpy as np

steps = []
accuracies = []
accuracies_norm = []
error_bars = []
error_bars_norm = []

# Extract data from the results list
for checkpoint_data in results:
    step = checkpoint_data["configs"]["dfir_mcq_mod"]["metadata"]["revision"]
    steps.append(step)

    # Extract the accuracy data
    result_data = list(checkpoint_data['results'].values())[0]  # Get the first (and only) subject
    accuracies.append(result_data['acc,none'])
    accuracies_norm.append(result_data['acc_norm,none'])
    error_bars.append(result_data['acc_stderr,none'])
    error_bars_norm.append(result_data['acc_norm_stderr,none'])

# Create a figure and axis
fig, ax = plt.subplots(figsize=(10, 6))

# Plot both regular and normalized accuracy
ax.errorbar(steps, accuracies, yerr=error_bars, fmt='o-', label='Regular Accuracy')
ax.errorbar(steps, accuracies_norm, yerr=error_bars_norm, fmt='s-', label='Normalized Accuracy')

# Add labels and title
ax.set_xlabel('Checkpoint Step')
ax.set_ylabel('Accuracy')
ax.set_title('DFIR Accuracy by Checkpoint Step')
ax.legend()
ax.grid(True, alpha=0.3)

# If steps are not evenly spaced, you might want to adjust x-ticks
if len(steps) > 0:
    plt.xticks(steps)

# Show the plot
plt.tight_layout()
plt.show()
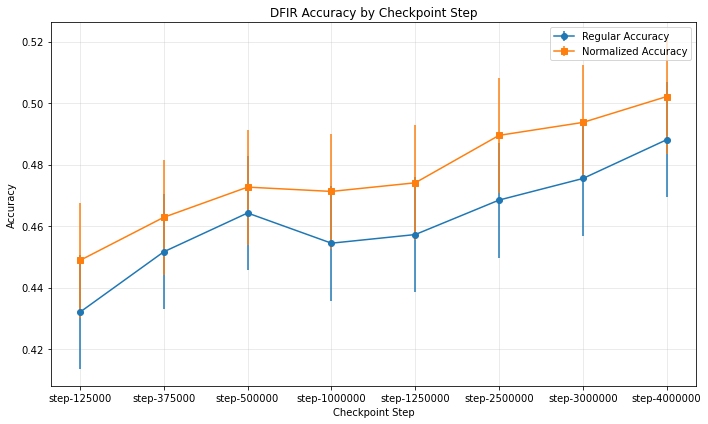
If everything goes well we will have a similar plot, we can clearly see that the model performance is getting better with the checkpoints, the more tokens seen in the training the better our model performs on our benchmarking task.

Introducing the var approach to our benchmark
As explained earlier MMLU-Var turns a multiple choice question benchmark into a completion task which helps evaluating the generative capabilities of a model by computing the log probability of the model generating the right answer token. Lets write a configuration for a dfir-var mode and check the difference. The task configuration can be added following the same approach but we just need to remove the options from the previous doc_to_text option:
task: dfir_mcq_mod_var
dataset_path: json
dataset_name: null
dataset_kwargs:
  data_files: "lm_eval/tasks/dfir/dataset/validation.jsonl"
validation_split: train
output_type: multiple_choice
num_fewshot: 5
doc_to_text: "{{question.strip()}}\nAnswer:"
doc_to_choice: "{{options.values() | list}}"
doc_to_target: "{{ ['A', 'B', 'C', 'D'].index(answer) }}"

metric_list:
  - metric: acc
    aggregation: mean
  - metric: acc_norm
    aggregation: mean


metadata:
  version: 1.0
  revision: "{{model_args['revision']}}"
Now we can just use the same command but change the task name and the output folder name
NCCL_P2P_DISABLE=1 NCCL_IB_DISABLE=1 python3 ./lm_eval/__main__.py --model hf --model_args pretrained=HuggingFaceTB/SmolLM2-1.7B-intermediate-checkpoints,dtype=bfloat16,revision=step-125000 --tasks dfir_mcq_mod_var --batch_size auto --output_path results_mod_var/
running the command over multiple checkpoints of the model would give the following plot:
That's it for this time providing more details will maybe make this article much longer so let's keep it simple. I hope you had fun !